#GitHub Pro
Explore tagged Tumblr posts
Visit Tumblr Blog
Explore Tumblr blogs with no restrictions, modern design and the best experience.
Last Seen Tumblr Blogs


Fun Fact
In 2020, 27% of US Tumblr users had an annual household income of over $100,000.
Text
5 Top Trested Web Site Old GitHub Accounts In 2025
Buy GitHub Accounts.If you are a developer, you must have a GitHub account. Buy GitHub accounts. Because GitHub is the world’s biggest code repository. Most developers use GitHub to exchange code and collaborate with others. The old GitHub account works well. You may buy new and existing GitHub accounts from us at extremely affordable prices with complete confidence. Thank you!
#Buy GitHub Accounts#Buy github accounts online#GitHub Free#GitHub Free for organizations#GitHub pricing#GitHub private repository free#GitHub Pro#GitHub Pro pricing#Is a GitHub account free?
2 notes
·
View notes
Text

#Buy GitHub Accounts#Buy github accounts online#GitHub Free#GitHub Free for organizations#GitHub pricing#GitHub private repository free#GitHub Pro#GitHub Pro pricing#Is a GitHub account free?
1 note
·
View note
Text
new website just dropped https://swag.lgbt
#codeblr#web development#it took a year but i finally updated my personal site#and it just. links to tumblr and github#pro-tip#click (or tap) on the pride flag#to cycle thru all my flags !!
6 notes
·
View notes
Text
Agent Mode In GitHub Copilot For Your VS Code Workflow

More context for your tools and services makes GitHub Copilot more agentic, driven by the finest models.
For MSFT's 50th anniversary, Microsoft Azure is releasing Visual Studio Code's agent mode to all users, which now supports MCP and lets you access any context or feature. Microsoft is also thrilled to provide a local, open-source GitHub MCP server that lets you incorporate GitHub features into any MCP-capable LLM product.
To fulfil its promise to offer a range of models, it is adding Anthropic Claude 3.5, 3.7 Sonnet, 3.7 Sonnet Thinking, Google Gemini 2.0 Flash, and OpenAI o3-mini to all paid Copilot levels through premium requests. All base model paying subscriptions feature unlimited agent mode, context-driven chat, and code completion requests. Premium requests add to them. With the new Pro+ tier, developers may use Copilot's latest models.
More to the agent awakening. The Copilot code review agent is also being released via Microsoft Azure. Over 1 million GitHub engineers have used the preview in a month. The next change recommendations are public, so you may tab tab tab your way to coding greatness.
VS Code agent mode
Agent mode will be gradually made accessible to VS Code users in stable in the following weeks to ensure total availability. It may now be manually activated. Agent mode can put your thoughts into code, unlike chat or multi-file modifications, which enable you suggest code changes across several workspace files. Agent mode challenges Copilot to go beyond simple prompts. To ensure your goal is fulfilled, it completes all subtasks across automatically discovered or created files. Agent mode may propose tool calls or terminal instructions. Additionally, it evaluates run-time defects and self-heals.
Since February, VS Code Insiders has allowed developers to tweet contributions, create web apps, and automatically fix code generation bugs in agent mode.
OpenAI GPT-4o, Google Gemini 2.0 Flash, and Claude 3.5 and 3.7 Sonnet power agent mode. Agent mode currently passes SWE-bench Verified with Claude 3.7 Sonnet 56.0%. As chain of thought reasoning models improve, agent mode should get stronger.
Model Context Protocol (MCP) public preview is currently available
Developers must research, navigate telemetry, manage infrastructure, code, and debug all day. They use engineering stack tools to achieve this. MCP gives agent mode context and tools to help you, including a USB port for intelligence. When you input a conversation prompt in agent mode in Visual Studio Code, the model can utilise numerous tools to understand database structure or do online searches. More interactive and context-sensitive coding is available with this option.
Agent mode could ask an LLM what to do with the list of MCP tools and the prompt to “Update my GitHub profile to include the title of the PR that was assigned to me yesterday”. The agent would repeatedly call tools until the job was done.
On GitHub, you may already use the enormous and growing MCP ecosystem. This repository is a great community inventory with top MCP servers. The GitHub local MCP server makes agent mode a powerful GitHub platform user by searching code and repositories, resolving problems, and producing PRs.
Configure local and remote MCP servers using Visual Studio Code's agent mode. See the repository to use the GitHub local MCP server, now natively enabled in Visual Studio Code.
Requests for premium models
Since GitHub Universe, Microsoft Azure has included discussion, multi-file editing, and agent mode models. Since these models are generally available, it is creating a new premium request type. Premium requests are included on all basic model paying plans (currently OpenAI GPT-4o) along with unlimited agent mode, context-driven chat, and code completions.
Starting May 5, 2025, Copilot Pro members will receive 300 monthly premium requests. From May 12 to 19, 2025, Copilot Business and Enterprise users will receive 300 and 1000 monthly premium requests. These premium models are uncontrolled till then.
It also offers a $39-per-month Pro+ subscription with top models like GPT-4.5 and 1500 monthly premium requests.
For extra premium request use, Copilot paying members can pay as they go. Individuals and organisations can utilise more requests than the maximum supplied to conveniently track spending. Copilot Admin Billing Settings lets GitHub Copilot Business and Enterprise administrators manage requests. Extra premium requests cost $0.04 apiece.
You can use Copilot's base model without restrictions while employing a more powerful or efficient model when needed. Premium models consume a set number of requests.
#technology#technews#govindhtech#news#technologynews#agent mode#AI#artificial intelligence#GitHub Copilot#VS Code#Copilot pro
0 notes
Text
Download Driver Booster 12 Pro Key https://fulltechsoft.com/ https://fulltechsoft.com/ https://fulltechsoft.com/

#driver booster 12 pro key#driver booster 12 key#driver booster 12#driver booster 12 license key#driver booster 12 pro license key#driver booster 12 pro#driver booster 12 serial key#iobit driver booster 12 pro key#key driver booster 12#github driver booster 12 license code
0 notes
Text
http://nanodesks.github.io
http://akiraliwanag.github.io
#nanodesks#github#life#life pro#lpro#destiny#hacking#lifehack#python#terminal#education#work#job#metaphysics#buddhism#art#anonymous
0 notes
Text
Anon's explanation:
I’m curious because I see a lot of people claiming to be anti-AI, and in the same post advocating for the use of Glaze and Artshield, which use DiffusionBee and Stable Diffusion, respectively. Glaze creates a noise filter using DiffusionBee; Artshield runs your image through Stable Diffusion and edits it so that it reads as AI-generated. You don’t have to take my work for it. Search for DiffusionBee and Glaze yourself if you have doubts. I’m also curious about machine translation, since Google Translate is trained on the same kinds of data as ChatGPT (social media, etc) and translation work is also skilled creative labor, but people seem to have no qualms about using it. The same goes for text to speech—a lot of the voices people use for it were trained on professional audiobook narration, and voice acting/narration is also skilled creative labor. Basically, I’m curious because people seem to regard these types of gen AI differently than text gen and image gen. Is it because they don’t know? Is it because they don’t think the work it replaces is creative? Is it because of accessibility? (and, if so, why are other types of gen AI not also regarded as accessibility? And even then, it wouldn’t explain the use of Glaze/Artshield)
Additional comments from anon:
I did some digging by infiltrating (lurking in) pro-AI spaces to see how much damage Glaze and other such programs were doing. Unfortunately, it turns out none of those programs deter people from using the ‘protected’ art. In fact, because of how AI training works, they may actually result in better output? Something about adversarial training. It was super disappointing. Nobody in those spaces considers them even a mild deterrent anywhere I looked. Hopefully people can shed some light on the contradictions for me. Even just knowing how widespread their use is would be informative. (I’m not asking about environmental impact as a factor because I read the study everybody cited, and it wasn’t even anti-AI? It was about figuring out the best time of day to train a model to balance solar power vs water use and consumption. And the way they estimated the impact of AI was super weird? They just went with 2020’s data center growth rate as the ‘normal’ growth rate and then any ‘extra’ growth was considered AI. Maybe that’s why it didn’t pass peer review... But since people are still quoting it, that’s another reason for me to wonder why they would use Glaze and Artshield and everything. That’s why running them locally has such heavy GPU requirements and why it takes so long to process an image if you don’t meet the requirements. It’s the same electricity/water cost as generating any other AI image.)
–
We ask your questions anonymously so you don’t have to! Submissions are open on the 1st and 15th of the month.
#polls#incognito polls#anonymous#tumblr polls#tumblr users#questions#polls about ethics#submitted april 15#polls about the internet#ai#gen ai#generative ai#ai tools#technology
329 notes
·
View notes
Text
How to Archive VODs and Clips
Whether you want to download VODs and/or clips for your own records or because you’d like to share them online, knowing how to archive things is handy, especially when so many streams become lost media once they’re deleted off Twitch and/or YouTube.
Here are a few programs that I use for Royal Archivist!
—
Of all the programs on this list, my personal favorites / the ones I most strongly recommend are Cobalt and Twitch Downloader! (When all else fails, OBS is also a good backup).
Cobalt

Cobalt has gained a lot of popularity the past few months, and for good reason! It's a very reliable, extremely user-friendly website that lets you save videos in MP4 formats, convert them into MP3 formats, or video-only without sound.
Cobalt is currently compatible with: BlueSky, Dailymotion, Facebook, Instagram, Loom, OK, Pinterest, Reddit, RuTube, SnapChat, SoundCloud, Streamable, TikTok, Tumblr, Twitch, Twitter, Vimeo, VK, Xiohongshu, and YouTube.
Twitch’s built-in download feature
If you’re downloading your own clip, this is the easiest method to use
First, navigate to your clips page.
To do this, click on your Twitch icon and go to “Creator Dashboard.” There will be a row of icons on your left - click the fifth button from the top (the one above the settings icon) and click on the link that says “Clips.”
At the top of the page, click on “Clips I’ve Created” and you should see a list of every clip you’ve ever made (regardless of whether or not you’ve published them, the clips are there!)
If you're having trouble, you can also type: https://dashboard.twitch.tv/u/ YOUR USERNAME HERE /clips/created
Click on the share button, and the list shown in the photo below will pop up.
After you click on the “Download” button (for landscape or portrait), a new tab will open up with the clip (which will autoplay, so heads up if you have your volume turned up high!)
Right click on the video and click “Save Video As”

That’s all there is to it! Please keep in mind that Twitch’s download function only works for clips you’ve made! You cannot use it to download VODs, or other people’s clips.
Twitch Downloader

Twitch Downloader is by far the BEST Twitch download program I have ever used. I’ve used several different ones, some which have broken because of Twitch’s updates, others which have fallen into disrepair because their creator no longer updates the program, but this one has been working consistently for me for a little over a year now. I’ve kept it very close to my chest because I’m terrified it’ll stop working one day, but it’s better to share resources than horde them out of fear.
Pros:
HD quality for all downloads! Whatever quality the stream was, that’s the quality the download will be (unless you adjust anything in the settings).
The best feature of this program is you can adjust how much you want to clip! Only want a 30 second clip from a 6 hour VOD? You can specify the section you want to download so long as you know the timestamps where you want the clip to start and where you want it to end.
You can download entire VODs.
When saving the file, it will automatically enter the original name of the stream and the stream date. (You can change this, but it’s very handy when you’re downloading an entire VOD and not a section of one).
It will automatically prompt you to update it when a new version has been released. (You do have the option to opt out of this, if you want).
There are a lot of other features available, however, I’ve never tried any of them so I can’t say how well they work. The Github page has a lot of examples and a Q&A section though, so check that out if you’re curious!
On the rare occasion that the program encounters issues, it's easy to use a past version, and the creators are quick to release new updates that resolve any problems. As of today (February 21, 2025) the latest version is currently 1.55.2, which updated last week.
Cons:
Sometimes when you click “Get Info” it won’t immediately load the VOD. This is pretty easy to solve by just restarting the program, so it’s not a huge issue imo.
You can’t preview clips before you download them, so you need to know the exact timestamps you want.
You can’t download VODs that are privated or no longer on Twitch.
How to use:
Download Twitch Downloader from Github and install the version that works for your computer. (In this case, I would download the GUI Windows-x64.zip version. Make sure you’re downloading the GUI version if you want a user-friendly version of this program).
Enter the URL of the VOD you’d like to download.
You can adjust the quality of the video and the length. If nothing is specified in the “Crop Video” section, it will download the entire VOD.
Once you’re ready, click the “Download” button and you’re good to go!
Open Video Downloader

If you’ve ever wanted to download any kind of video, I’m sure you’ve heard of Youtube-dl. There are different versions of this program, but some of them are a bit finicky and if things stop working, it can be difficult and frustrating trying to figure out what went wrong and how to fix it — which is why I recommend this program.
Open Video Downloader, aka youtube-dl-gui, is one of the best video downloaders I’ve ever used. It’s basically Youtube-dl with a Graphical User Interface (GUI) that makes the program very easy for anyone to use.
Pros:
No coding knowledge required! VERY user-friendly.
The creator fixes user issues very quickly! Whenever the program experiences a problem, a new update is released within 24 hours.
It can download videos from pretty much all major social media platforms, including Youtube, Twitter, Tumblr, Twitch clips, Instagram, and more.
Cons:
You can’t adjust the length of what you want to download. If you want to download a 2 minute section from a 5 hour Youtube VOD, you’ll have to download the entire video.
On rare occasions, I’ve had issues where it cannot download an unlisted Youtube video. There are sometimes ways to get around this, but it’s a pain and usually not worth the effort.
How to use it:
Download the latest version of the program from GitHub. Scroll all the way down to “Assets” and select the version that’s right for your computer. (For example, I use Windows, so I would download the .exe file).
Once you’ve installed it, you can start downloading things! For this example, let’s say I want to download Quackity’s “Welcome to the QSMP” video. All I need to do is copy the link and paste it into the white box at the top of the program.
Once that’s done, you should see the video pop up in your download queue. You can queue multiple videos to download at once (you can also download entire playlists too). When you’re ready, click the green download button on the bottom right (as shown in the picture below) or if you only want to download one specific video from your queue, click the download button (circled in red) next to the video.
You can adjust the quality of the video you want to download, and in theory you can choose whether to download just the audio or just the video of a video, but personally that’s never worked for me. That might just be a me issue though.
If you’d like to change where your videos are saved to, click the Folder button (circled in yellow) and choose a download destination. If nothing is chosen, it will default to your Downloads folder.

There are ways you can customize this program, but like I said earlier, this program is very very easy to use and does not require any tinkering whatsoever. You open it, download what you want, then close it. Nice and simple!
Other Recommendations
OBS is a good backup when all else fails! I have to use OBS pretty frequently for YouTube VODs, since there aren't a lot of tools that let you clip parts of a YouTube video (and I'd rather not download an entire 7 hour long VOD for a 30 second clip). There are already a lot of good tutorials out there explaining how to use OBS, so I recommend poking around and seeing what works best for you. If you're new to video downloading / archiving things, I'd still recommend starting with some of the tools I mentioned above first.
I’d recommend making a folder on your computer for clips. I find it very helpful to name all my files with this method: [Stream date] Streamer name - Something that helps me remember what this clip is about / something that will help me find it later, or a quote.
Example: [2-6-24] Mike - I hate capitalism
If you’ve got a significant amount of clips on your computer, I’d recommend backing them up and/or saving them to an external harddrive!
That’s about it! I apologize if I’ve missed any steps, but hopefully everything is more or less easy enough for folks to understand! I’m someone who does not like downloading random programs onto my computer and I’m very paranoid about cyber security, but I’ve used these programs for over a year now, and they’re very reliable and trustworthy. 10/10, I recommend both of them.
Lastly: if anyone has a recommendation for good Youtube clip downloaders, please let me know! I haven’t found any good programs that let me specify how much of a Youtube video I’d like to download, and I am suffering. Help your friendly neighborhood Archivist so I can share more clips from the early days of QSMP.
#Twitch#Resources#FAQ#This post is brought to you by me teaching my coworker about Cobalt today#Coworker: Wow this is amazing! How did you learn all this stuff?#Me: I edit a lot of goofy gay cubito clips ∠( ᐛ 」∠)_#I didn't tell her that but I'm pretty honest about my fandom hobbies when people ask me directly lol#I've put so many sideblog shenanigan things on my resume#I ran a character design blog for like... 5 - 7 years or so?#and I still have stuff from that in my portfolio#Literally any ''silly'' fandom thing you do can be used for your resume#You just need to know how to phrase it#It was very funny when one of my past bosses looked me dead in the eye and said ''You're kind of a nerd aren't you?''#It made me laugh#I'm more of a geek than a nerd but I wear both titles proudly#Anyways that's your RA fun fact of the day#I've posted this before (as an addition to one of Bell's posts) but that one's a tiny bit out of date now#So here's a (slightly) more updated version
409 notes
·
View notes
Text
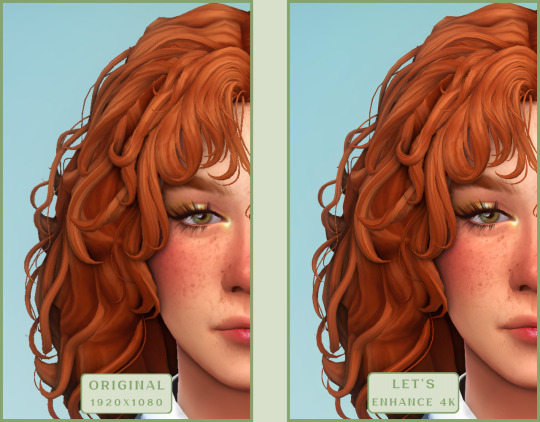
SRWE or AI? Best Ways to Upscale Sims 4 Screenshots
Are you also tired of seeing social media mercilessly crush your The Sims 4 screenshots? We’ve tried every trick in the book to keep our pics crisp – SRWE, AI upscalers, you name it – and now we’re ready to break down how to save your favorite sim’s photos from pixelation, quick and easy. In this article, we’ll explain (no tech jargon, promise!) what actually works, plus share our hands-on experience and top tips.
Your upscaling method depends heavily on the source image and the look you’re going for. We all have different ideas of what makes a sims beautiful – some love natural textures, even slight skin imperfections, while others prefer flawlessly smooth, hyper-sharp results.
We’ve tested different upscaling tools to help boost your screenshot quality. But to find your perfect match – the one that makes your shots look just right (by your standards!) – we recommend trying a few yourself.
You can enhance screenshots both before and after saving them! We’ve covered both approaches, so pick whichever suits you best.
Before Saving the Screenshot: SRWE (Simple Runtime Window Editor)
This tool is well-known in The Sims 4 community – there are tons of YouTube tutorials covering it. When it comes to improving image quality before taking a screenshot, SRWE is one of the first solutions that comes to mind.
It works by bypassing Windows' DPI scaling, allowing you to capture screenshots at a higher resolution without blurring.
Pros:
— A fantastic tool: it delivers the exact same image but in much better quality.
— No conflicts with GShade/ReShade: your presets will look exactly as intended.
— Free and easy to install, no hidden costs or complicated setup.
— No post-processing needed, preserves original texture and UI quality.
— No extra plugins or presets required, works right out of the box.
— Great performance even on low-end PCs. If your computer can run GShade, SRWE will work just fine.
Cons:
— Limited functionality.
— Some users find SRWE a bit tricky to set up (though we personally disagree).
Now, let’s break down how to use it and what results to expect.
If you prefer a video guide, check out this link for a detailed walkthrough by Chii.
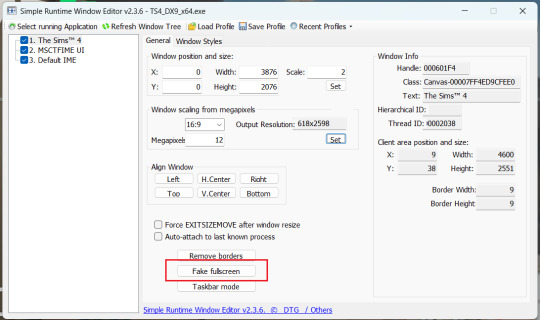
Step 1
First things first – you'll need to download the program itself. It's available for free on GitHub – you can grab it here.
There's no real benefit to getting the version with pre-configured profiles, so just download the standard version without profiles.
Step 2
Extract the files from the archive.
It doesn’t matter where you store them on your computer – it won’t affect how the program works.
Step 3
Now it’s time to launch the game and switch from fullscreen to windowed mode in the settings. You can also do this with the Alt+Enter shortcut.
Step 4
Set up your shot exactly how you want it. Open the location, pose your sims, apply any presets if needed. At this point, you can take a regular screenshot (for comparison) using your usual method.
Step 5
1. Go back to the SRWE folder.
There are only two files inside – one of them launches the program (no installation needed).

2. In the window that opens, select The Sims 4 from the list.
3. Check all the boxes.
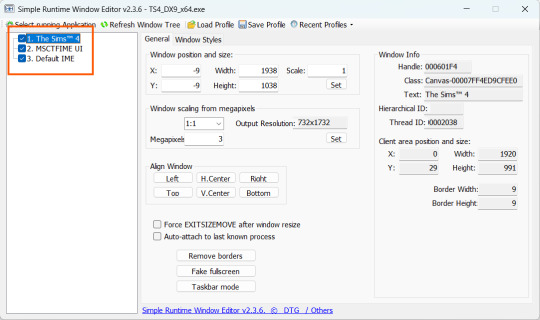
4. Image Size
You can set your screenshot size in a few different ways:
— The easiest method: Multiply your current resolution by the desired factor. For example, to upscale 1080p to 4K, multiply by 2. Tap Set.
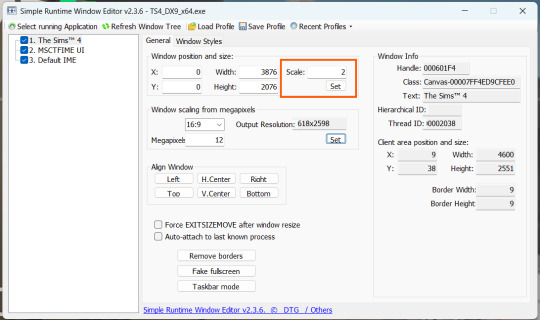
— Manual input: Enter your preferred pixel dimensions. Tap Set.
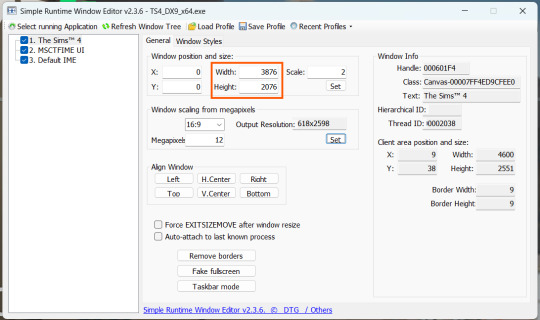
— Aspect ratio mode: Choose a format (1:1, 16:9, 4:3, etc.) and set your target megapixels. The program will automatically calculate the dimensions. Tap Set.
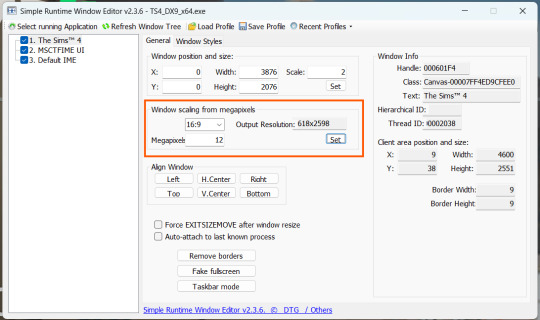
Honestly, you can experiment with any size. During our tests, even a weak PC handled an 8K screenshot without issues – though realistically, 4K is more than enough for most purposes.
Plus, if you're capturing in-game scenes (not just CAS), your screenshots will already be pretty large in file size. You probably won’t want them taking up even more space unnecessarily.
Step 6
Now when you return to the game, you'll notice the image has become significantly larger and no longer fits your screen resolution – you're only seeing a part of it.
Don't panic! Just wait for your preset to fully load (if you're using one), then take your screenshot as you normally would.
Step 7
Once you've captured your planned screenshot, head back to SRWE and click "Fake Fullscreen" to return to the original resolution.
Now let's compare our results.
Gameplay Scenes
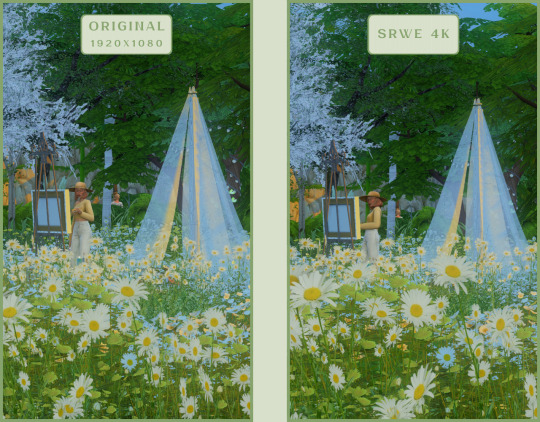
CAS
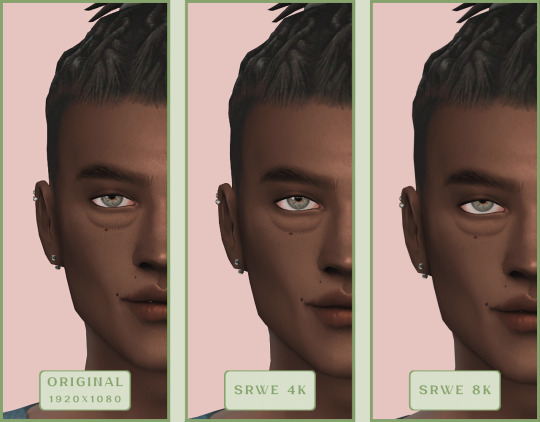
For in-game screenshots, this method works much better if you have at least a moderately powerful PC. After upscaling, navigation can become tricky due to lag. That said, it's still completely doable since we've prepared our scene in advance.
Post-Processing Screenshots
We've tested several post-processing programs: two paid options and several free ones.
Let's start with the paid options – Topaz Gigapixel AI and Let's Enhance.
Topaz Gigapixel AI
A specialized tool from Topaz Labs designed specifically for AI-powered image upscaling.
It doesn’t include extra features like noise reduction or face correction, but it delivers more precise upscaling, which is especially useful for The Sims 4 screenshots.
Pros:
— Upscale up to 600% (6x) without losing detail.
— Preserves texture clarity (hair, clothing, patterns).
— Automatically restores lost details (e.g., small decor items).
— Supports batch processing (multiple screenshots at once).
Cons:
— $99 price tag.
— Requires a powerful PC for 4K upscaling.
— Limited functionality (just upscaling, no additional edits).
— Trial version doesn’t allow exports.
Example:

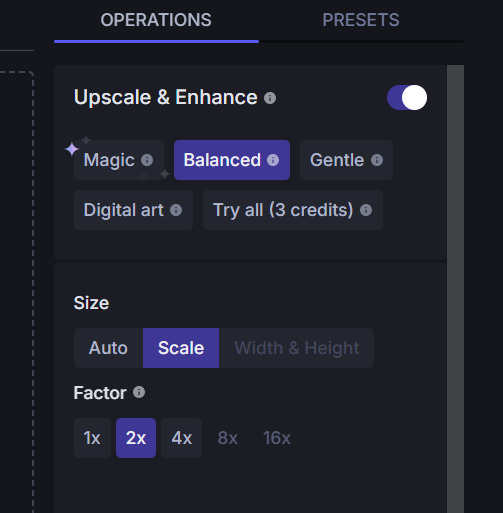
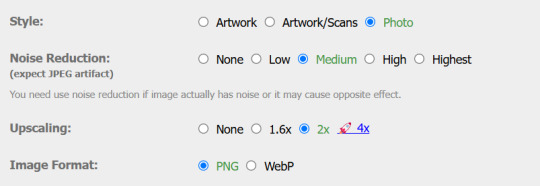
Let's Enhance
A convenient online AI-powered tool for enhancing screenshots. No downloads required – just head to https://letsenhance.io/boost and you're good to go.
Pros:
— Automatic upscaling up to 16K, boosts resolution without losing detail (hair and clothing textures become sharper).
— Dead simple to use: just upload your screenshot, pick a model, and download the result.
— AI doesn't just upscale, it subtly "beautifies" images too (though this is subjective, of course).
Cons:
— Free version limits you to 10 images/month (watermarked downloads; subscription starts at $9/month).
— Internet connection required (no offline mode).
We found these settings work best for Sims screenshots:
Now, let's see the results:
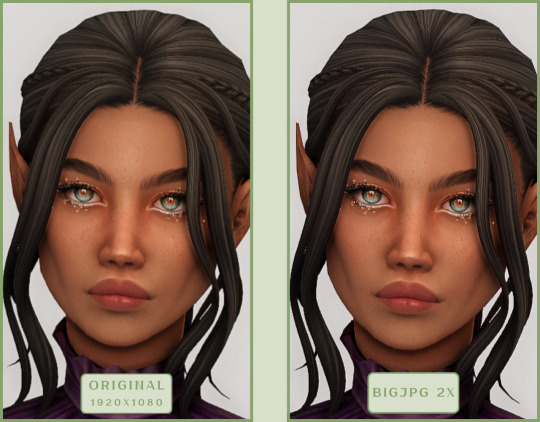
Free Upscaling Tools: Upscayl (with detailed usage guide), Bigjpg, and Waifu2x.
Bigjpg
A handy tool for basic image upscaling tasks, though the free version has limitations on processing speed and number of images.
Pros:
— Solid baseline results: boosts resolution effectively, making images noticeably sharper with genuine quality improvement.
— Free 2x/4x upscaling with watermark-free downloads.
Cons:
— Free version restricts image quantity, size, and processing speed.
— Lacks advanced parameter fine-tuning.
Our recommended settings combo:

The 4x upscale delivers noticeably weaker results.
Sample Bigjpg output:
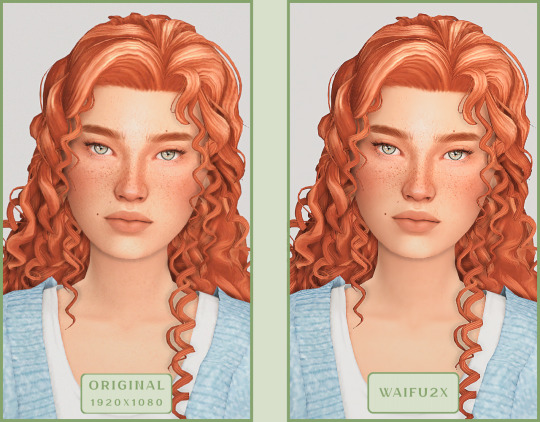
Waifu2x
A free neural network-based tool. Originally created for upscaling anime images, but works perfectly for The Sims 4 as well.
Pros:
— Upscales images 1.5x–2x without noticeable distortion.
— Preserves art style, doesn't turn pixel art into a "blurry mess" (unlike some other upscalers).
— Available in both online and offline versions.
— Offline version supports batch processing of screenshots.
— Free 2x upscaling with no watermarks.
— No powerful PC required.
Cons:
— Free online version has a 5MB file size limit.
— Maximum 2x scale (no higher options).
— Lacks advanced parameter tuning.
Our recommended settings:
Waifu2x results:
Upscayl
A free, open-source program that uses neural networks to upscale images without quality loss.
Pros:
— Upscales images without distortion.
— Enhances fine details.
— Supports multiple AI models for different screenshot styles.
— Offline version handles batch processing.
— Free 4x upscaling with no watermarks.
— Doesn't require a powerful PC for 2x upscaling.
— Works offline, no internet needed after installation.
Cons:
— Requires a powerful PC for 4x upscaling.
— Minimalist interface – fewer beginner-friendly guides.
— Lacks advanced parameter tuning.
Given Upscayl's minimalist interface and lack of detailed tutorials, we decided to provide a more thorough walkthrough.
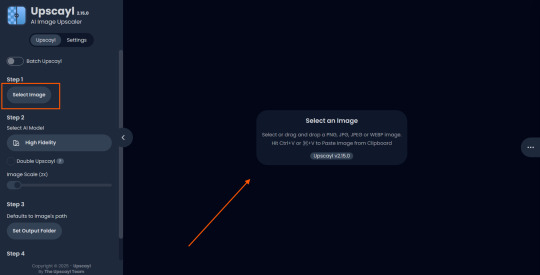
Step 1
First, download the program from its GitHub page. It's completely free and open-source.
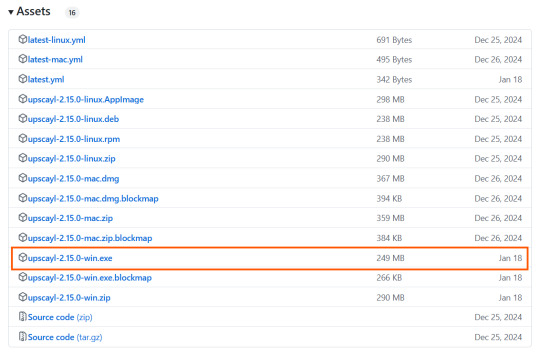
Multiple versions are available – choose the one matching your system. For standard Windows, download the file highlighted in the screenshot below.
Step 2
Run the installer as administrator.
Install location doesn't matter – it won't affect performance. Select the destination folder. Click "Install".
Step 3
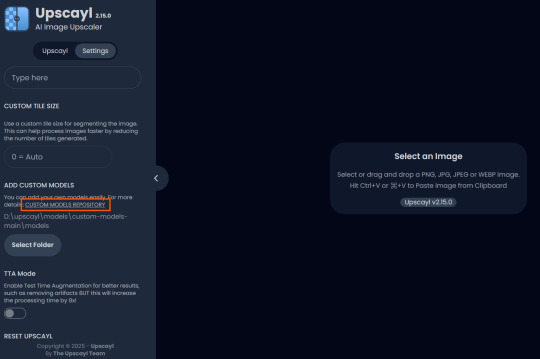
Upscayl includes several built-in AI models (good for testing), but we strongly recommend downloading custom models for better results:
1. Download the custom models pack here (also accessible via Settings → Add Custom Models in-app).
2. Extract the archive.
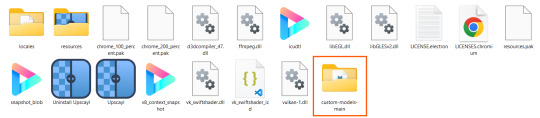
3. Navigate to custom-models-main → custom-models-main.
Move this folder to your Upscayl installation directory (optional: rename it).
Your Upscayl folder should now look like this:
4. Add Custom Models:
— Launch Upscayl.
— Go to Settings and click Select Folder.
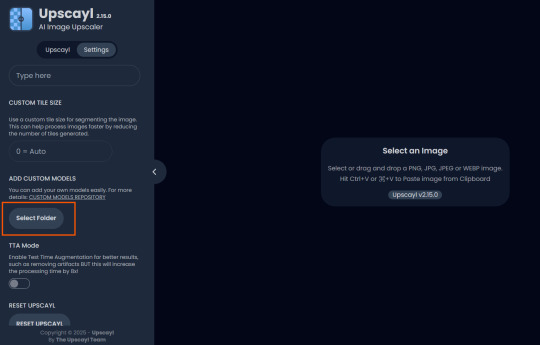
— Navigate to Upscayl → custom-models-main → models
Critical: The folder must be named "models" – don't rename it.
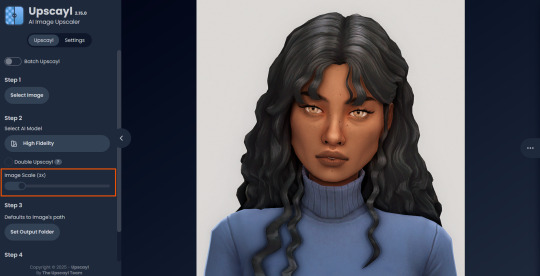
Step 4
Now that you have both the default and custom models loaded, it's time to start enhancing your screenshots.
1. Click Select Image or simply drag and drop your file into the processing area.
2. Choose Upscale Factor.
While Upscayl supports up to 16x magnification, it warns that anything above 5x may severely strain your system.
For optimal results, stick with 2x to 4x.
3. Select AI Model.
Click the Select AI Model dropdown: default models show before/after previews, custom models appear as a text list.
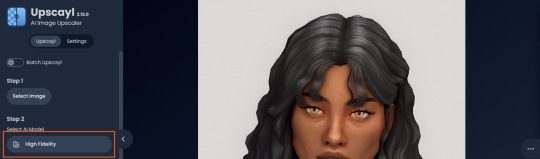
4. Experiment! Try different models on the same screenshot. Test various scales (2x, 3x, 4x) – sometimes better results come from modest scaling, while 4x might degrade quality.
For this demo, we'll use the first default model.
5. Click to begin enhancement.
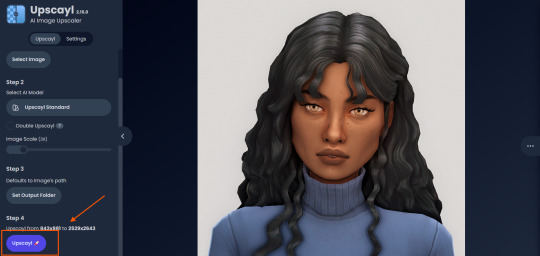
6. Processing time duration depends on original image quality, selected parameters and your PC's power (may complete quickly or take several minutes).
After processing, you'll see a clear side-by-side comparison of the changes.
7. Click the three-dot menu (⋮) for advanced viewing options.
Magnifying lens compares original vs. enhanced versions side-by-side.
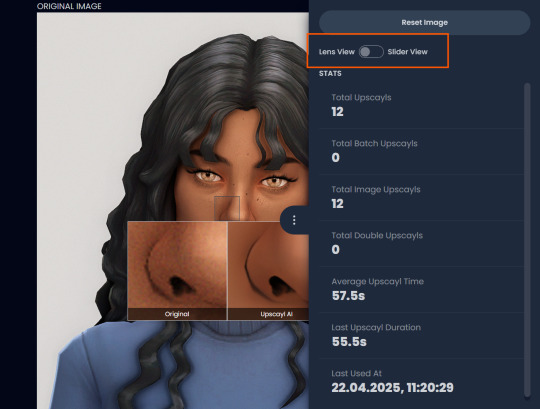
Also you may reset to original and revert all changes instantly.
8. Save your image.
By default, Upscayl saves to the source image's folder. To change this click Set Output Folder.

9. After this, use the Ctrl+S keyboard shortcut, and the new image will be saved. The original filename will be appended with the name of the AI model used and the upscaling scale applied.
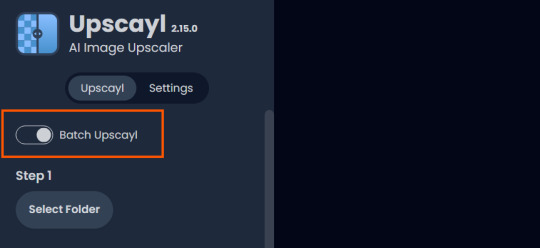
You can also use batch processing. Before loading images, you simply need to enable batch loading.
In the settings, there are different format options for saving processed images: PNG, JPG, WEBP. To preserve the best quality, we recommend choosing PNG.
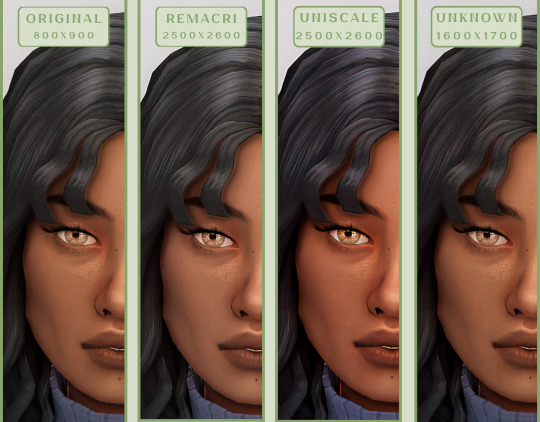
Finally, we're sharing the AI model options we liked best for processing Sims screenshots:
— Remacri (default model)
— Uniscale Restore (custom model)
— Unknown-2.0.1 (custom model)
🌱 Create your family tree with TheSimsTree
❓ Support 🌸 Our Blog
#TheSimsTree#simslegacy#legacychallenge#sims4#sims2#sims3#simsfamily#simstree#sims#sims4legacy#sims4roleplay#sims4stories#sims4couple#thesims4#ts4#ts4cc#plumtreeapp#simsta#simstagram#sims proposal#sims ideas#inzoi
38 notes
·
View notes
Text

It was a record shattering week at ActBlue – the site which raises money for Democratic candidates, causes, and charities.
Since autumn of 2020 Ryan Murphy at GitHub has been tracking donations to ActBlue. The most money previously given to ActBlue had previously been during the seven days starting 27 September 2020. Last week ActBlue raised $252,517,168. All but the first 13 hours and 46 minutes of that was after Joe Biden stepped aside and Kamala Harris became the presumptive Democratic nominee.
Not ALL of the money raised at ActBlue was specifically for the Harris campaign. But comparison with the previous week (beginning 14 July 2024) shows that Kamala-Mania was a HŪGE factor.
July 14th - July 20th: $61,349,601
July 21th - July 27th: $252,517,168
US: Kamala Harris campaign raises $200 million in one week
The presumptive nomination of Vice President Kamala Harris to run for the Democratic Party in November's presidential election continues to make waves in US politics. The Harris campaign team said on Sunday that in her first week since President Joe Biden dropped out of the race, and the party coalesced around her, the candidate raised over $200 million (€184 million) in donations. "In the week since we got started, Kamala Harris has raised $200 million dollars. 66% of that is from new donors. We've signed up 170,000 new volunteers," Harris' deputy campaign manager, Rob Flaherty, posted on X, formerly Twitter.
^^^ emphasis added
Keep in mind that Elon Putz has pledged $45 million a month to pro-MAGA PACs – i.e. $225 million. Trump is soliciting $1 billion from oil execs. Far right Silicon Valley tech oligarchs like Peter Thiel are also getting involved financially with Trump.
So there's no time to rest on our accomplishments. Freedom is not free and we need to continue to offer our own volunteer and financial support to pro-democracy candidates like Kamala Harris.
In 2020 there was a stretch when ActBlue took in over $100 million for eight weeks in a row. That's part of what it took to evict Trump from the White House. A similar effort will be needed this year to keep him out.
BTW, visit Ryan Murphy's ActBlue tracker. It's updated every 10 minutes.
ActBlue Ticker Tracker / Ryan Murphy | Observable
#kamala harris#harris for president#kamala harris 2024#fundraising#democrats#actblue#ryan murphy#actblue ticker#elon musk#donald trump#the far right#tech oligarchs#volunteer to save democracy#election 2024#vote blue no matter who
56 notes
·
View notes
Text
Best WebSite In 2025 Old GitHub Accounts Purchase Now Quickly
Buy GitHub Accounts.If you are a developer, you must have a GitHub account. Buy GitHub accounts. Because GitHub is the world’s biggest code repository. Most developers use GitHub to exchange code and collaborate with others. The old GitHub account works well. You may buy new and existing GitHub accounts from us at extremely affordable prices with complete confidence. Thank you!
#Buy GitHub Accounts#Buy github accounts online#GitHub Free#GitHub Free for organizations#GitHub pricing#GitHub private repository free#GitHub Pro#GitHub Pro pricing#Is a GitHub account free?
0 notes
Text
Buy GitHub Accounts
Buy GitHub Accounts.If you are a developer, you must have a GitHub account. Buy GitHub accounts. Because GitHub is the world’s biggest code repository. Most developers use GitHub to exchange code and collaborate with others. The old GitHub account works well. You may buy new and existing GitHub accounts from us at extremely affordable prices with complete confidence. Thank you!
#Buy GitHub Accounts#Buy github accounts online#GitHub Free#GitHub Free for organizations#GitHub pricing#GitHub private repository free#GitHub Pro#GitHub Pro pricing#Is a GitHub account free?
0 notes
Text
this is just your regular reminder that the shinigami eyes extension is abandonware! the github issues discussion hasn't been touched since 2019, never mind the extension itself.
it's not useless, but it also has unfixed issues that sometimes result in anti-trans and trans-friendly labels getting swapped (for programmer-types, there's a short explanation on how that happens here), and none of the reports being made get put into the database anymore. if you flag an account, the color change will show up locally, i.e. just for you, but not anyone else.
like i said, it's not useless! but if you're still using shinigami eyes just make sure you're careful about how you use it. if someone says something kind of terf-y and they're also marked red then yeah, you can probably assume it's bad faith and not a misunderstanding, but if you're just seeing an artist or an organization or something that's marked pro or anti trans in shinigami eyes but doesn't have obvious ties in any direction, do some poking around yourself before making a final judgment.
157 notes
·
View notes
Text

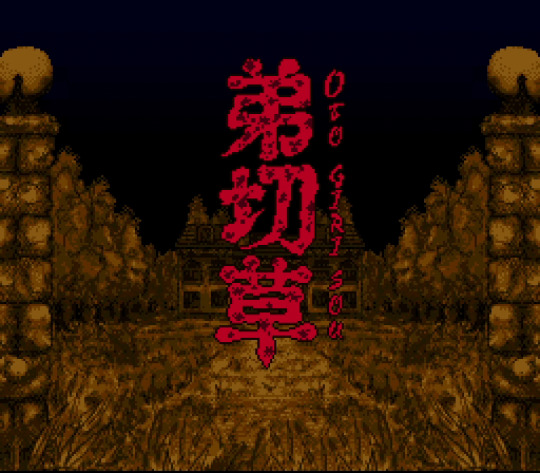


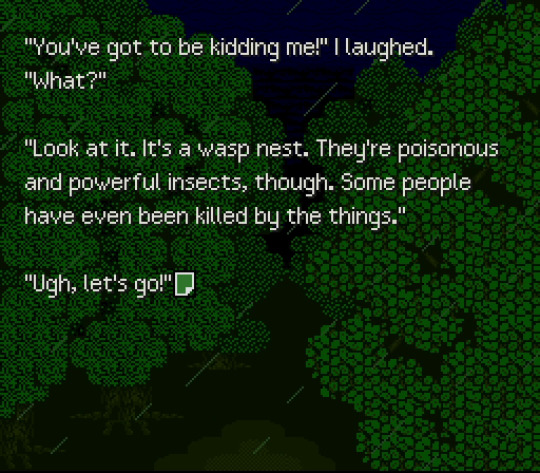
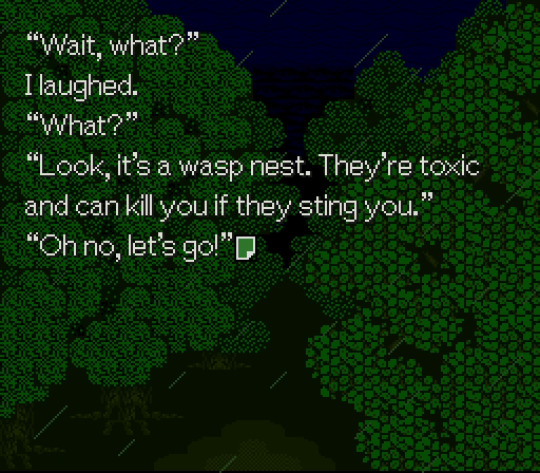

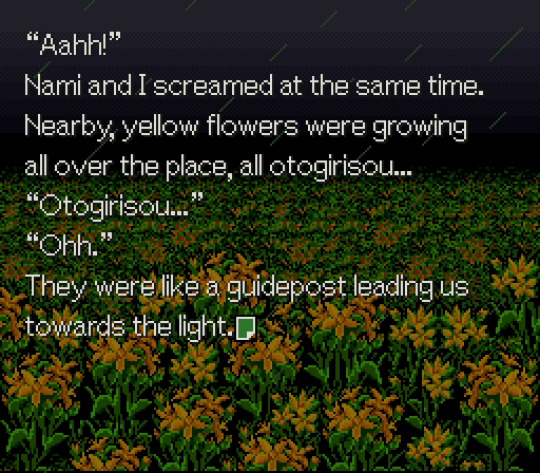
I've been hoping someone would translate one of Chunsoft's sound novels on the Super Famicom for a long time and yesterday I discovered that there are are actually now two translations available for Otogirisou (Chunsoft's first sound novel). The most recent was just released by Tom and DDS (featured on the left) while the other was quietly uploaded a few months prior by a translator named ButThouMust (featured on the right). I think it is always cool when there are multiple translations available for a single title, so I posted some comparisons between the two translations.
ButThouMust's patch is still a work-in-progress, with the author stating that it is about 95% complete, and the script is still being polished (although it can be played to completion). The other patch by Tom and DDS is fully complete and even the game's manual was translated.
ButThouMust's patch seems to make less small changes to the script, with the characters comparing things to "yokai" instead of "monsters" in Tom's translation and how the flowers are called "otogirisou" instead of "hypericum". However, the font is also much larger, which makes it easier to read but it also means that the sentences in Tom's translation feel less truncated. ButThouMust's patch also retains Japanese honorifics, although they also have a version of the patch that removes them. I'm usually fine with honorifics being removed but ButThouMust makes an argument that they should be retained since Nami, the main character's girlfriend, actually uses different honorifics in each playthrough of the game. I'm not sure how Tom's patch translates this aspect of the game or if it is just removed.
There seems to be some pros and cons to each patch but I just like having options available. Now players can decide which translation they prefer instead of only having one avenue for experiencing the game.
You can download ButThouMust's beta patch on their GitHub page and Tom's patch on his website.
88 notes
·
View notes
Text

Resources and study tips to get you in cyber forensics
Master post • Part1 • part2
let's get you prepped to be a cyber sleuth without spending any cash. Here’s the ultimate tips and resources.
Ps: you can't become one while doing these pointers but you can experience the vibe so you can finally find your career interest

### 1. **Digital Scavenger Hunts**
- **CTF Challenges (Capture The Flag)**: Dive into platforms like [CTFtime](https://ctftime.org/) where you can participate in cyber security challenges. It's like playing *Among Us* but with hackers—find the imposter in the code!
- **Hunt A Killer (Digitally)**: Create your own digital crime scenes. Ask friends to send you files (like images, PDFs) with hidden clues. Your job? Find the Easter eggs and solve the case.
### 2. **YouTube University**
- **Cyber Sleuth Tutorials**: Channels like *HackerSploit* and *The Cyber Mentor* have playlists covering digital forensics, cybersecurity, and more. Binge-watch them like your fave Netflix series, but here you're learning skills to catch bad guys.
- **Live Streams & Q&A**: Jump into live streams on platforms like Twitch where cybersecurity experts solve cases in real-time. Ask questions, get answers, and interact with the pros.
### 3. **Public Libraries & eBook Treasure Hunts**
- **Library eBooks**: Most libraries have eBooks or online resources on digital forensics. Check out titles like *"Hacking Exposed"* or *"Digital Forensics for Dummies"*. You might have to dig through the catalog, but think of it as your first case.
- **LinkedIn Learning via Library**: Some libraries offer free access to LinkedIn Learning. If you can snag that, you've got a goldmine of courses on cybersecurity and forensics.
### 4. **Virtual Study Groups**
- **Discord Servers**: Join cybersecurity and hacking communities on Discord. They often have study groups, challenges, and mentors ready to help out. It's like joining a digital Hogwarts for hackers.
- **Reddit Threads**: Subreddits like r/cybersecurity and r/hacking are packed with resources, advice, and study buddies. Post your questions, and you’ll get a whole thread of answers.
### 5. **DIY Labs at Home**
- **Build Your Own Lab**: Got an old PC or laptop? Turn it into a practice lab. Install virtual machines (VMware, VirtualBox) and play around with different operating systems and security tools. It’s like Minecraft but for hacking.
- **Log Your Own Activity**: Turn on logging on your own devices and then try to trace your own steps later. You’re basically spying on yourself—no NSA required.
### 6. **Community College & University Open Courses**
- **Free Audit Courses**: Many universities offer free auditing of cybersecurity courses through platforms like Coursera, edX, and even YouTube. No grades, no stress, just pure learning.
- **MOOCs**: Massive Open Online Courses often have free tiers. Try courses like "Introduction to Cyber Security" on platforms like FutureLearn or edX.
### 7. **Scour GitHub**
- **Open-Source Tools**: GitHub is full of open-source forensic tools and scripts. Clone some repositories and start tinkering with them. You’re basically getting your hands on the tools real investigators use.
- **Follow the Code**: Find projects related to digital forensics, follow the code, and see how they work. Contribute if you can—bonus points for boosting your resume.
### 8. **Local Meetups & Online Conferences**
- **Free Virtual Conferences**: Many cybersecurity conferences are virtual and some offer free access. DEF CON has a lot of free content, and you can find tons of talks on YouTube.
- **Hackathons**: Look for free entry hackathons—often universities or tech companies sponsor them. Compete, learn, and maybe even win some gear.
### 9. **DIY Challenges**
- **Create Your Own Scenarios**: Get a friend to simulate a hack or data breach. You try to solve it using whatever tools and resources you have. It's like escape rooms, but digital.
- **Pen & Paper Simulation**: Before diving into digital, try solving forensic puzzles on paper. Map out scenarios and solutions to get your brain wired like a detective.
### 10. **Stay Updated**
- **Podcasts & Blogs**: Tune into cybersecurity podcasts like *Darknet Diaries* or follow blogs like *Krebs on Security*. It’s like getting the tea on what’s happening in the cyber world.
### 11. **Free Software & Tools**
- **Autopsy**: Free digital forensics software that helps you analyze hard drives and mobile devices. Think of it as your magnifying glass for digital clues.
- **Wireshark**: A free tool to see what's happening on your network. Catch all the data packets like you're a digital fisherman.
### 12. **Online Forensics Communities**
- **Free Webinars & Workshops**: Join communities like the *SANS Institute* for free webinars. It's like attending a masterclass but from the comfort of your gaming chair.
- **LinkedIn Groups**: Join groups like *Digital Forensics & Incident Response (DFIR)*. Network with pros, get job tips, and stay in the loop with the latest trends.
### 13. **Practice Cases & Mock Trials**
- **Set Up Mock Trials**: Role-play with friends where one is the hacker, another the victim, and you’re the investigator. Recreate cases from famous cybercrimes to see how you'd solve them.
- **Case Studies**: Research and recreate famous digital forensic cases. What steps did the investigators take? How would you handle it differently?

There you have it—your roadmap to becoming a cyber sleuth without dropping a dime. You don't have time find your interest after paying pennies to different ppl and colleges. You can explore multiple things from comfort of your home only if you want to.

#light academia#study blog#academic validation#academic weapon#student life#study motivation#study with me#study#studyblr#studyblr community#masterpostjam#codeblr
31 notes
·
View notes
Text
Christopher Ren does a solid Elon Musk impression.
Ren is a product manager at Reality Defender, a company that makes tools to combat AI disinformation. During a video call last week, I watched him use some viral GitHub code and a single photo to generate a simplistic deepfake of Elon Musk that maps onto his own face. This digital impersonation was to demonstrate how the startup’s new AI detection tool could work. As Ren masqueraded as Musk on our video chat, still frames from the call were actively sent over to Reality Defender’s custom model for analysis, and the company’s widget on the screen alerted me to the fact that I was likely looking at an AI-generated deepfake and not the real Elon.
Sure, I never really thought we were on a video call with Musk, and the demonstration was built specifically to make Reality Defender's early-stage tech look impressive, but the problem is entirely genuine. Real-time video deepfakes are a growing threat for governments, businesses, and individuals. Recently, the chairman of the US Senate Committee on Foreign Relations mistakenly took a video call with someone pretending to be a Ukrainian official. An international engineering company lost millions of dollars earlier in 2024 when one employee was tricked by a deepfake video call. Also, romance scams targeting everyday individuals have employed similar techniques.
“It's probably only a matter of months before we're going to start seeing an explosion of deepfake video, face-to-face fraud,” says Ben Colman, CEO and cofounder at Reality Defender. When it comes to video calls, especially in high-stakes situations, seeing should not be believing.
The startup is laser-focused on partnering with business and government clients to help thwart AI-powered deepfakes. Even with this core mission, Colman doesn’t want his company to be seen as more broadly standing against artificial intelligence developments. “We're very pro-AI,” he says. “We think that 99.999 percent of use cases are transformational—for medicine, for productivity, for creativity—but in these kinds of very, very small edge cases the risks are disproportionately bad.”
Reality Defender’s plan for the real-time detector is to start with a plug-in for Zoom that can make active predictions about whether others on a video call are real or AI-powered impersonations. The company is currently working on benchmarking the tool to determine how accurately it discerns real video participants from fake ones. Unfortunately, it’s not something you’ll likely be able to try out soon. The new software feature will only be available in beta for some of the startup’s clients.
This announcement is not the first time a tech company has shared plans to help spot real-time deepfakes. In 2022, Intel debuted its FakeCatcher tool for deepfake detection. The FakeCatcher is designed to analyze changes in a face’s blood flow to determine whether a video participant is real. Intel’s tool is also not publicly available.
Academic researchers are also looking into different approaches to address this specific kind of deepfake threat. “These systems are becoming so sophisticated to create deepfakes. We need even less data now,” says Govind Mittal, a computer science PhD candidate at New York University. “If I have 10 pictures of me on Instagram, somebody can take that. They can target normal people.”
Real-time deepfakes are no longer limited to billionaires, public figures, or those who have extensive online presences. Mittal’s research at NYU, with professors Chinmay Hegde and Nasir Memon, proposes a potential challenge-based approach to blocking AI-bots from video calls, where participants would have to pass a kind of video CAPTCHA test before joining.
As Reality Defender works to improve the detection accuracy of its models, Colman says that access to more data is a critical challenge to overcome—a common refrain from the current batch of AI-focused startups. He’s hopeful more partnerships will fill in these gaps, and without specifics, hints at multiple new deals likely coming next year. After ElevenLabs was tied to a deepfake voice call of US president Joe Biden, the AI-audio startup struck a deal with Reality Defender to mitigate potential misuse.
What can you do right now to protect yourself from video call scams? Just like WIRED’s core advice about avoiding fraud from AI voice calls, not getting cocky about whether you can spot video deepfakes is critical to avoid being scammed. The technology in this space continues to evolve rapidly, and any telltale signs you rely on now to spot AI deepfakes may not be as dependable with the next upgrades to underlying models.
“We don't ask my 80-year-old mother to flag ransomware in an email,” says Colman. “Because she's not a computer science expert.” In the future, it’s possible real-time video authentication, if AI detection continues to improve and shows to be reliably accurate, will be as taken for granted as that malware scanner quietly humming along in the background of your email inbox.
13 notes
·
View notes